Well its my birthday today - another day older another day wiser, yeh right? I reckon it was an old person who made that one up just to make themselves feel better on their Birthday??? So not only it is my Birthday but I am the Host of our Fancy Friday Challenge which has re-launched today. Being the Host means I will be looking at everyone's work and Blogs and I will be picking the Top 5 at the end of it. This is always a difficult task as we get so many lovely entries.
So as it is my Birthday (and its the only chance I have had to write my Blog) I will keep it short and sweet and give you a little tutorial of how I made this Canvass which is my DT Sample, for inspiration. Also over at the Fussy and Fancy Challenge Blog you will be able to see all the lovely entries from the rest of the Design Team.
I used : Clarity Stamp Stencil
This is actually a picture of my Gelli plate all set up ready to take my print. I didn't take the print with the Stencil on though. I did the drag affect in the background and took my mini Canvass to the Gelli, of course in Hind Sight, why didn't I just take the Gelli to the Canvass???
The reason I did this was because I wanted the stiped look to be the outline of the houses, you will see what I mean in a minute.
I put on Yello Ocra and Brayered to cover the Gelli Plate, I then added a little line of brown at the top only and dragged it into the Yellow with a Rubber Comb.
I used a little more paint than usual so that it would soak onto the Canvass.
Of course instead of taking the Canvass to the Gelli I could have taken the Gelli to the Canvass??
I used the leftover paint from the Gelli Plate to comb onto the side of the cavass so that it matches the inner part.
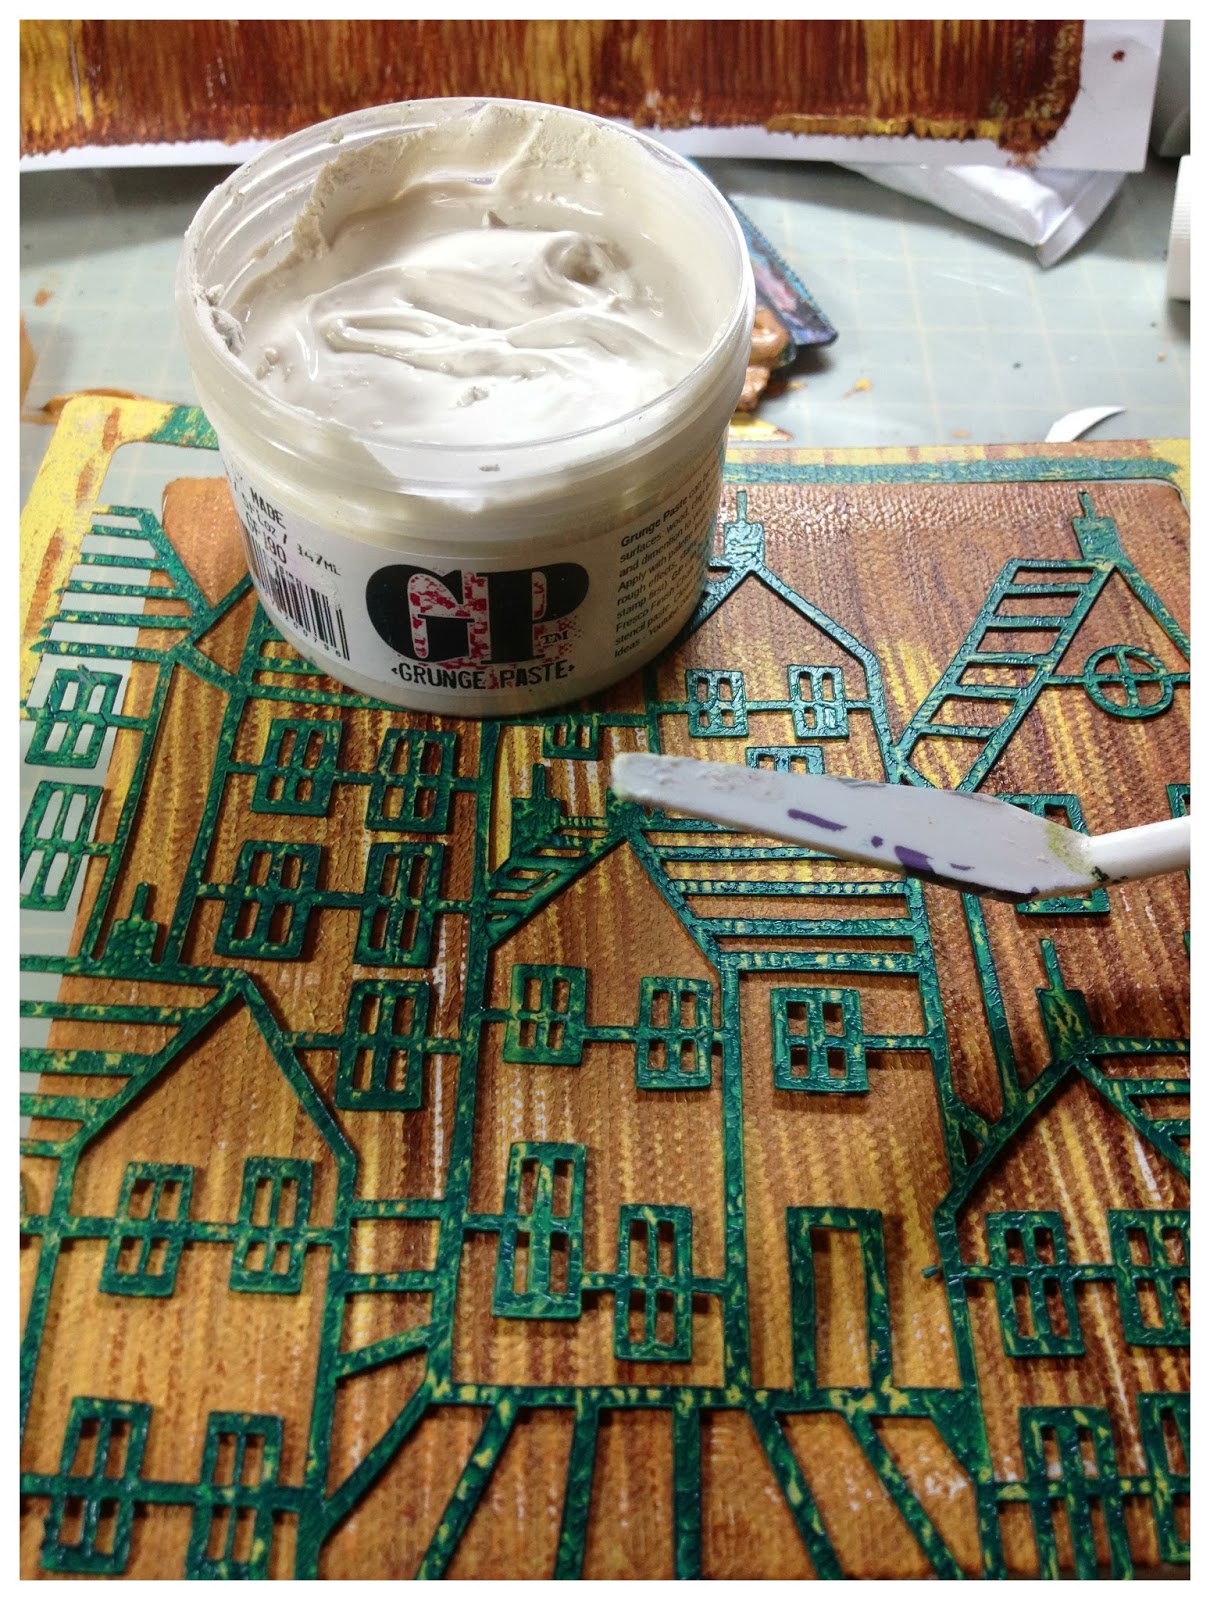
When the paint was dry (this doesn't take long but you can heat dry it a little) I placed the Stencil onto the canvas and plastered the GP over it. Trying to get is as smooth as possible at first but then realised it will look much better with a bit of texture after all its brick right?
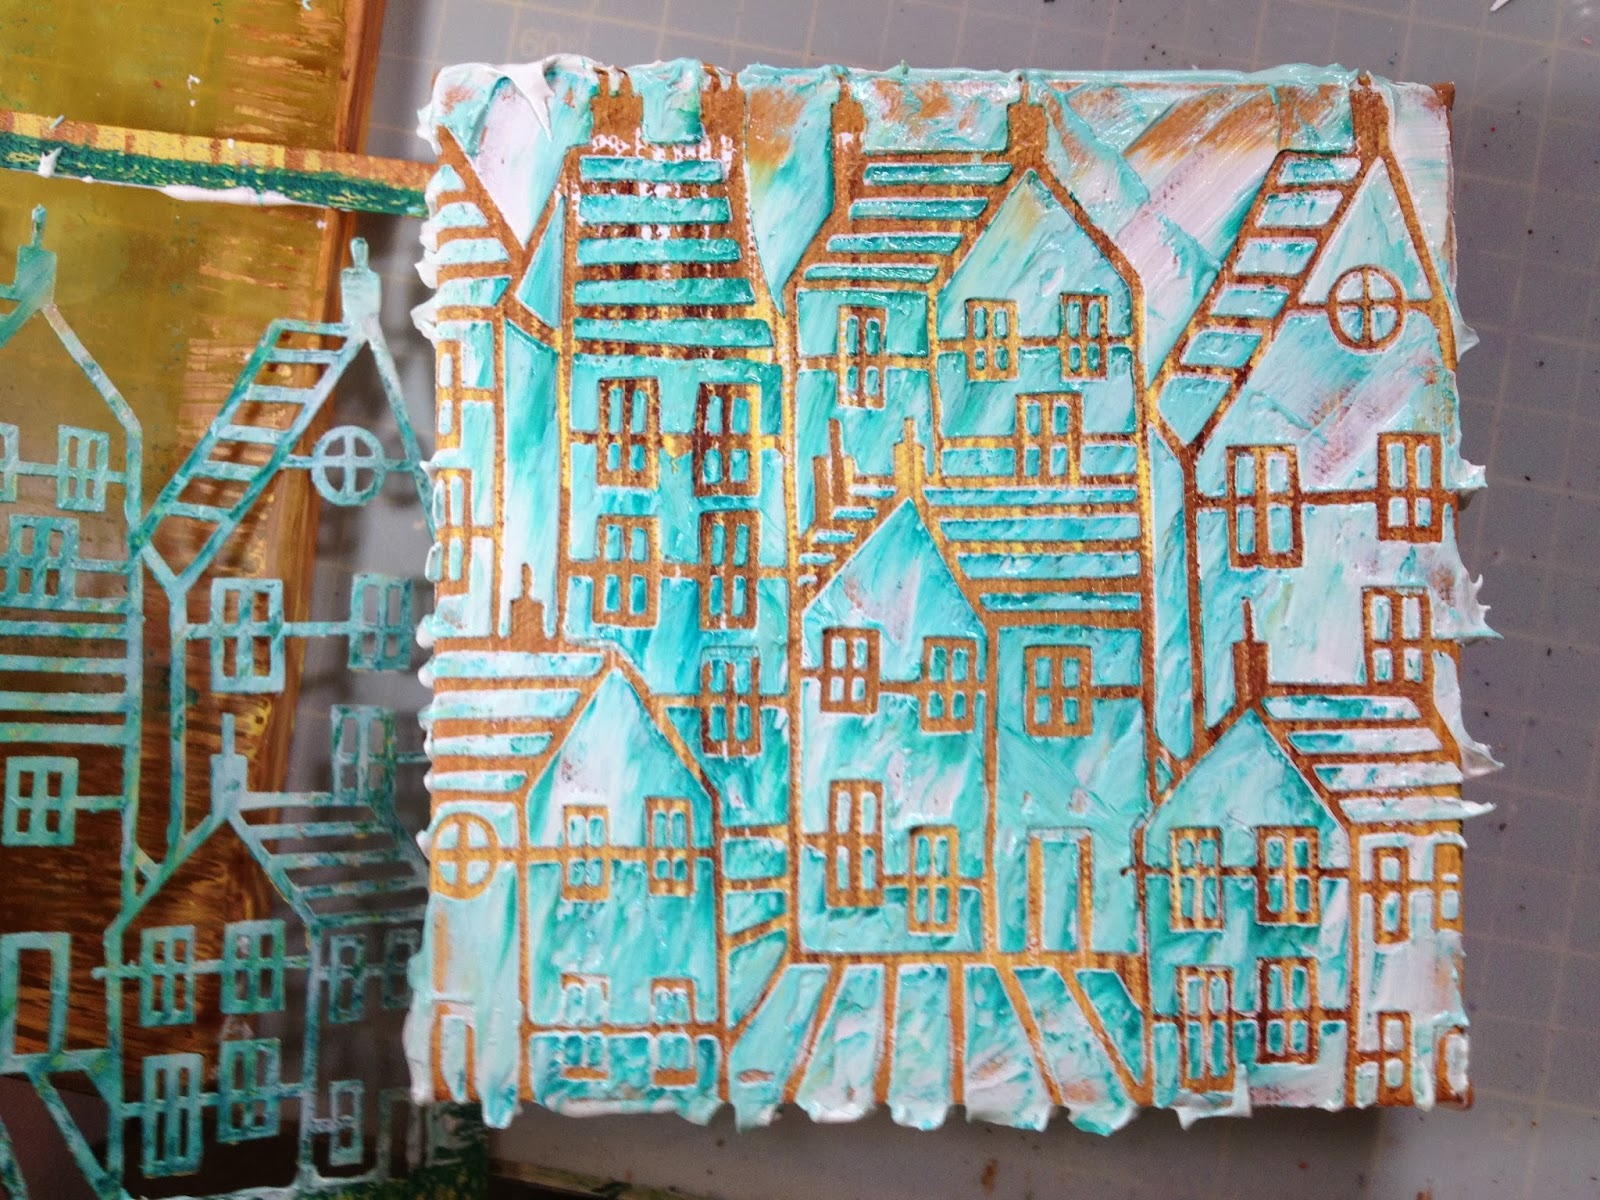
So you can see here there is more interest added where you have the GP slightly uneven. The GP will pick up colour amazing well which can be a good thing but not always, this blue? there was a tiny bit of dried blue paint left on my Palate knife! So obviously if you wanted to colour your GP before you plaster you could.
So to the left is the stencil itself, which I washed very quickly, GP dries very hard but just washes away if done straight away, not sure what my drains look like???? So on the right is the canvass.
See all the bits hanging over the edge? I did debate weather to leave them that way but think they would have eventually got knocked off anyway so scraped them off with a Palate Knife, like you would the icing on a cake?
So Theresa Pace I know this is the bit you wanted to see. Sorry I got so engrossed in colouring this that I didn't get any "Action" Shots!! But I can tell you what I did. With the Dylusions Sprays I did three shots of the darkest colour and two of the lightest. I was pleasantly surprised at the results of this, I didn't even know if it would soak into the GP but it did. The reason this is all reds is because our Challenge, which this is my Design Piece for is monochromatic/ well it was but was changed to Monotone, which gives more scope I suppose.
So once I had used the Dylusions I thought it was a little too dark and needed some light areas. I got out a sponge and gently swept it across areas that were "jutting up" I liked the effect so went a bit mad and gave it a good old rub around with both paints making sure to leave light and dark areas.
I then used a white Pen to outline some of the lines of the houses because I always think thinks look better with an outline and these houses are so beautiful because of the style which is all about the outline. I also used the white pen on some of the window. I do think the background off the Gelli Plate worked and think a lot more could be done, imagine a Greek style house for instance? Or all White with black lines in-between? You can get this Stencil From Clarity Stamp, I recommend it to anyone I love it. Next time I will do a Blue Skye and
I painted the sided randomly with the Orange and Red Paint because it was undercoated with the paint from the Gelli Plate so I wanted some of this to still show through. I then used the punchinella
and Gold paint to put random spots and blotches onto the sides, don't you just hate it when you see a beautiful canvass and you walk past the side of it and its just white?? Now don't get me wrong sometimes it looks better white but sometimes it doesn't??? Mind if I had my way the back would
match too?
So there you have it my lovely row of houses, well not mine exactly, it was Barbara Gray who drew them and turned them into this gorgeous stencil? I will be putting a few of these in the Art Café.
You know the great thing? This stencil matches my 15 by 15cm box canvass EXACTLY to the edge.
I think the pictures gives a full explanation of the process of this Canvass but I have updated my description with full explanation as a few people have asked for me to. One in particular, Theresa I am looking forward to seeing your results entered into this Challenge or Clarity?? Or both?
I hope you like it. I always welcome comments.
I hope you like it. I always welcome comments.
So why don't you have a little play and enter out Challenge.
Bye for now
Carry On Crafting
Sam


Well HAPPY BIRTHDAY dear Sam!!!! And a HUGE WOW to this very FABULOUS piece of art work!!! So much work...an amazing tutorial...thanks for sharing!!! Have a most WONDERFUL day Birthday Girl!!
ReplyDeleteAmazing......! I've started a blog but it's got nothing on it yet as I'm getting my head around how it works! Saying that I did manage to post Barbara's give away button ! Just need to do some work to put on it!
ReplyDeleteThis canvas is brilliant - literally in colour and magnificent in design! Well done and Happy Birthday!
Hi I was like you just a few years ago, I had just decided I wanted a blog and fudged my way through, but it's great to learn for yourself isn't it. Thank you for your comment. X
DeleteFirstly, Happy Birthday Sam... and then WOW to this lovely canvas... great tutorial in fact so good I'm off over to Clarity to buy this stencil to add to my growing collection, I'm sure I'll find plenty of bits and bobs to make the P& P worthwhile. good luck with the hosting, I hate having to choose cos I love them all xx :)
ReplyDeleteYou won't regret it Annie I have so many ideas of things and styles I want t try with this Stencil I love it. It has a bit if an American feel to me. X
DeleteHappy birthday, Sam! :D
ReplyDeleteWhat a great canvas, and tutorial!
Really lovely x
ReplyDeleteHappy Birthday Sam, hope you are having a great day. I love your canvas and your photo tutorial is brilliant. It really has inspired me to have a go....even if I may get a bit messy!!!! Enjoy your evening out and have a good weekend....hugs. Jo. X
ReplyDeleteThisis fabulou Sam and tge pictures say it all xx
ReplyDeletei love it Sam but i think i'm thick as after you applied the white paste a missed a few steps as to how it was coloured. if you get some time wouldn't mind a couple of sentences of explanation xx
ReplyDeleteHo Theresa, yes I was a bit rushed I will fill in a little tomorrow. But basically I sprayed the GP with Dylusions after putting the stencil back on to keep the Gelli background in the edge if the houses, then I did some sponging with the paint to highlight some areas. . X
DeleteThank you so much Sam for adding the explanation. You know i'm a bit slow at times so i don't understand. Another stencil to go on the ever growing list.......And thanks for the mention even though it makes me look more daft..... love you too xx
DeleteAbsolutely love this Sam, such a fab piece of art x
ReplyDeleteHAPPY, HAPPY BIRTHDAY, SAM!!! I do hope that you are enjoying your birthday celebrations! And let me just say, "GASP!! WOW!! This canvas is absolutely OUTSTANDING!" Your tutorial is wonderful! I love that you added gold in the end! What a brilliant and perfect finishing touch! You are one very talented ARTIST! Thank you so much for sharing this for your feature!
ReplyDeleteI hope that you enjoy the weekend! HAPPY BIRTHDAY!
Big Warm Hugs, Sheryl
Thank you Sheryl I do love to have a good play on this Challenge Blog. Xx I hope it inspires people all crafting styles to have a go.
DeleteHappy Birthday Sam! I hope you had a lovely day. I saw your canvass on the chalenge blog and decided to have a closer look. The technique you've use is totally alien to me (I only make cards), but I love the outcome.
ReplyDeleteHi Sam...we'll I hope you had a super fun birthday!! I have been on vaca to visit my daughter in Alabama ....we are planning a wedding for her...we found her a dress!!!! So fun to spend time with her seeing we are many miles apart:). As for your canvas...OMG. I love it!!! Such wonderful tips for me to absorb!! Happy belated birthday once again.
ReplyDeleteHugs
Wonderful, so much colour and dimension! Gotta get this stencil!! x
ReplyDeleteWow this is truly stunning!
ReplyDeleteIt never fails to amaze me the different ways you all find to use the Gelli plate. The depth of colour on this is beautiful. I have just been sorting out some of my Clarity stamps and stencils to make sure I don't get too many duplicates. I reckon my daughter might get a few passed along her way. Any road up, when I have finished sorting them out, my Gelli is coming out for a serious session. Might be a bit of midnight oil burned over this lot. xx Maggie
ReplyDeletePS not only could I not take a picture of the moon the other night, but now the little camera I keep in my craft room (to take pictures of my messy desk for WOYWW (What's On Your Workdesk Wednesday) is totally flat, and I cannot find the battery charger. I think I have most sockets in the house taken up with charging one thing or another.
Hi Sam, loved this step x step of this brilliant canvas - great techniques.
ReplyDeleteThanks for visiting my blog.
Avril xx